Changing Easy Web Browsing Advanced Settings


How to Set Advanced Settings

settings panel

Easy Web Browsing offers two ways to set advanced options.

One way is to click the triangle button at the lower right corner of each button's area in the operation panel.

These areas are divided into three regions. The leftmost region includes advanced setting options related to "reading" the middle region includes those related to the "display" and the region on the right includes "other settings".


Speech settings

Speech settings

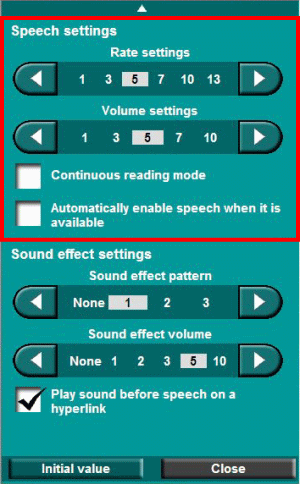
Speech settings(Speech) panel Use the "Rate settings" slider to select from five possible reading speeds.
  • Click a number to select the desired reading speed. The smaller the number, the slower the reading speed, and the larger the number, the faster.
  • Click Selection left move button to slow down the reading speed. If the speed is already at the slowest possible setting, then this button will not be selectable, and will be displayed as Selection left button un-displaying.
  • Click Selection right move button to speed up the reading speed. If the speed is already at the fastest possible setting, then this button will not be selectable, and will be displayed as Selection right button un-displaying.
Use the "Volume settings" slider to select from five possible reading volumes.
  • Click a number to select the desired reading volume. The smaller the number, the lower the reading volume, and the larger the number, the higher.
  • Click Selection left move button to lower the reading volume. If the volume is already at the lowest possible setting, then this button will not be selectable, and will be displayed as Selection left button un-displaying.
  • Click Selection right move button to raise the reading volume. If the volume is already at the highest possible setting, then this button will not be selectable, and will be displayed as Selection right button un-displaying.

This setting determines whether sentences, links and such on the open page are read in a consecutive manner. A displayed portion moves in conformity with a speech portion on that page. Do not move the cursor.

If you want to discontinue speech before it finishes, move the mouse to an area where no sentences or such exist on the page. If it still does not stop, right-click the mouse.

When you want to restart speech, move the mouse to the point from which you want to start speech. Speech starts from the paragraph to which the mouse is moved. You cannot start speech from the middle of a paragraph.

Continuous reading mode is disabled as the initial setting.

When the checkbox for "Automatically enable speech when it is available" is turned on, reading automatically starts. This function works in situations when a language is other than the one that was being read up to that point, as is the case when you move to a page in another language. Click this checkbox to turn it off.

Click the "Initial value" button to revert all settings in this advanced setting panel to their initial values.
Click the "Close" button to save all new settings as is.


Sound effect settings

sound effect setting panel Use the "Sound effect pattern" slider to select from four possible sound effect patterns. Sound effect patterns are a set of three sounds, which are used for the clicking sound of buttons, the page loading sound, and the loading completion sound. Three sound pattern options are available, along with a fourth silent (no sound effect) option. Only one sound effect pattern may be selected at a time.
  • Click either "None", "1", "2" or "3" to select a sound effect pattern.
  • Selection left move button and Selection right move button can also be used to select between "None", "1", "2", "3"
  • When Selection left button un-displaying or Selection right button un-displaying is displayed, that button cannot be clicked.
Pattern 1 is the initial setting.

Use the "Sound effect volume" slider to select from six possible sound effect volume settings.
  • Click the number indicating the desired sound effect volume. The smaller the number, the lower the sound effect volume, and the larger the number, the higher.
  • Click Selection left move button to lower the sound effect volume. If the volume is already at the lowest possible setting, then this button will not be selectable, and will be displayed as Selection left button un-displaying.
  • Click Selection right move button to raise the sound effect volume. If the volume is already at the highest possible setting, then this button will not be selectable, and will be displayed as Selection right button un-displaying.
3 is the initial setting.

This setting determines whether or not a sound will be played before a hyperlink is spoken.

Playing a sound before a link is spoken is the initial setting.

Click the "Initial value" button to revert all settings in this advanced setting panel to their initial values.
Click the "Close" button to save all new settings as is.


Zoom settings

Zoom settings

panel of Zoom setting Use the "Zoom rate" slider to set the screen display size within a range of 50% to 600%
  • Click the number indicating the desired zoom rate.
  • Each time Selection right move button is clicked, the zoom rate will increase in the following order: 50 → 75 → 100 → 125 → 150 → 175 → 200 → 300 → 400 → 600%.
  • Each time Selection left move button is clicked, the zoom rate will decrease in the following order: 600 → 400 → 300 → 200 → 175 → 150 → 125 → 100 → 75 → 50%.
  • When Selection left button un-displaying or Selection right button un-displaying is displayed, that button cannot be clicked.
  • The selected zoom rate is displayed next to the "Zoom rate" title.
When Easy Web Browsing is started for the first time, zoom rate is 100%.
The size of the text on a button and button cannot be changed.

Turn on the "Automatically adjust zoom rate to fit page width" checkbox to optimize the zoom rate to match the screen size of your personal computer.


Scrollbar width settings

panel of Scrollbar width settings

Use the "Scrollbar width" slider to set the scrollbar to one of four possible widths.

  • Select either "Normal", "16", "32" or "48".
  • Selection left move button and Selection right move button can also be used to select either "Normal", "16", "32" or "48".
  • When Selection left button un-displaying or Selection right button un-displaying is displayed, that button cannot be clicked.
(Scrollbar: A knob type portion that appears on the lower right side of the screen when the window is too small to display a whole page)
(Window: An independent and small screen that is prepared at the startup of a program. An image and document are displayed on such screen.)


When the "Enable mouse dragging scroll" checkbox is turned on, the displayed page can be scrolled by dragging a mouse.
To drag, bring the mouse pointer to the margin of the displayed page, hold the mouse's left button down, and move the mouse up, down, left, or right. The displayed page will be scrolled in synch with the mouse's movements.
This function can be invalidated by turning the checkbox off.

When Easy Web Browsing is started for the first time, the check is turned on.

Click the "Initial value" button to revert all settings in this advanced setting panel to their initial values.
Click the "Close" button to save all new settings as is.


Other settings

Selecting Other Setting Panel

panel of other setting

Select one of the following five items to open the associated advanced setting panel: "Space settings", "Ruler settings", "Color settings", "Highlight settings" and "Magnification window settings".

When another item is selected while any advanced setting panel is already open, the currently opened advanced setting panel will close, and the advanced setting panel for the newly selected item will open.

Click the "Close" button to quit the advanced setting panel.


Spacing settings

spacing setting panel

Use the "Space between lines" slider to select from five possible settings for the spacing between lines. If the lines appear to be too close together, try increasing this value a bit for easier reading.

  • Select either "Normal" to leave the line spacing unchanged, or a number to adjust it. The bigger the number, the wider the line spacing.
  • Click Selection left move button to reduce the line spacing. If the line spacing is already at the lowest possible setting, then this button will not be selectable, and will be displayed as Selection left button un-displaying.
  • Click Selection right move button to increase the line spacing. If the line spacing is already at the highest possible setting, then this button will not be selectable, and will be displayed as Selection right button un-displaying.
Line space may become narrower than the actual setting depending on the content format.
When Easy Web Browsing is launched for the first time, "Normal" is selected as the initial setting.

Use the "Space between English words" slider to select from five possible settings for the spacing between English words. This setting can be used to increase the space between words slightly in English text.
  • Select either "Normal" to leave the word spacing unchanged, or a number to adjust it. The bigger the number, the wider the word spacing.
  • Click Selection left move button to reduce the word spacing. If the word spacing is already at the lowest possible setting, then this button will not be selectable, and will be displayed as Selection left button un-displaying.
  • Click Selection right move button to increase the word spacing. If the word spacing is already at the highest possible setting, then this button will not be selectable, and will be displayed as Selection right button un-displaying.
When Easy Web Browsing is launched for the first time, "Normal" is selected as the initial setting.

Use the "Space between letters" slider to select from five possible settings for the spacing between letters. If the letters appear to be too close together, try increasing this value a bit for easier reading.
  • Select either "Normal" to leave the letter spacing unchanged, or a number to adjust it. The bigger the number, the wider the letter spacing.
  • Click Selection left move button to reduce the letter spacing. If the letter spacing is already at the lowest possible setting, then this button will not be selectable, and will be displayed as Selection left button un-displaying.
  • Click Selection right move button to increase the letter spacing. If the letter spacing is already at the highest possible setting, then this button will not be selectable, and will be displayed as Selection right button un-displaying.
When Easy Web Browsing is launched for the first time, "Normal" is selected as the initial setting.

Click the "Initial value" button to revert all settings in this advanced setting panel to their initial values.
Click the "Close" button to save all new settings as is.


Font settings

font settings panel

When the checkbox for "Larger font" is turned on, text is displayed in a slightly larger font size (125%).
When Easy Web Browsing is started for the first time, the check is turned off.

Click the "Initial value" button to revert all settings in this advanced setting panel to their initial values.
Click the "Close" button to save all new settings as is.


Ruler settings

ruler settings panel When the checkbox for "Show ruler" is turned on, crosshairs or a crossbar that moves in synch with the mouse appear. By placing a ruler on the line currently being read, this makes it harder to lose one's place.
When Easy Web Browsing is started for the first time, the check is turned off.

Use the "Ruler color settings" slider to select one of six colors for the ruler.
  • Click the desired color, which may be "Red," "Light Green", "Dark Blue", "Light Blue", "Gray", "Magenta" or "Yellow".
  • Selection left move button and Selection right move button can also be used to select either "Red," "Light Green", "Dark Blue", "Light Blue", "Gray", "Magenta" or "Yellow".
  • When Selection left button un-displaying or Selection right button un-displaying is displayed, that button cannot be clicked.
When Easy Web Browsing is launched for the first time, "Magenta" is selected as the initial setting.

Use the "Ruler size settings" slider to select one of three different ruler thickness settings.
  • Click the desired thickness setting, which may be either "Thin", "Medium" or "Thick".
  • Selection left move button and Selection right move button can also be used to select either "Thin", "Medium" or "Thick".
  • When Selection left button un-displaying or Selection right button un-displaying is displayed, that button cannot be clicked.
When Easy Web Browsing is launched for the first time, "Thick" is selected as the initial setting.

When the checkbox for "Hide vertical line and only show horizontal line" is turned on, the crosshairs is hidden and only the horizontal crossbar is shown.

When Easy Web Browsing is started for the first time, the check is turned off.

Click the "Initial value" button to revert all settings in this advanced setting panel to their initial values.
Click the "Close" button to save all new settings as is.


Color settings

color setting panel

Use the "Color pattern" slider to select one of nine different color patterns.

  • The following color patterns are available:
    • Initial color pattern
    • Black text on a pale yellow background with blue for links
    • Black text on a yellow background with blue for links
    • Black text on a dark yellow background with blue for links
    • Yellow text on a blue background with white for links
    • Yellow text on a black background with white for links
    • Black and white display
    • Inverted black and white display
    • Inverted color display
  • Selection left move button and Selection right move button can be used to select one of the nine color patterns.
  • When Selection left button un-displaying or Selection right button un-displaying is displayed, that button cannot be clicked.
You can also select the pattern directly from the nine patterns shown underneath the slider.
  • The currently selected pattern is indicated with a frame.
  • Use the mouse to select the desired color pattern. The pattern pointed by the mouse is surrounded by a frame.
  • Click on the pattern surrounded by a frame to select. The screen will be changed to your choice.
When Easy Web Browsing is launched for the first time, "Initial color pattern" is selected as the initial setting.

Click the "Initial value" button to revert all settings in this advanced setting panel to their initial values.
Click the "Close" button to save all new settings as is.


Highlight settings

highlight setting panel Use "Highlight type" slider to select one of four different highlight types.
  • The following highlight types are available:
    • Display the text currently being read inverted.
    • Display the text currently being read inside a frame.
    • Display the text currently being read with the parts above and below hidden.
    • Display the text currently being read with the surrounding parts hidden.
  • Selection left move button and Selection right move button can be used to select one of the four highlight types.
  • When Selection left button un-displaying or Selection right button un-displaying is displayed, that button cannot be clicked.
You can also select the type directly from four highlight types underneath the slider.
  • The currently selected type is indicated with a frame.
  • Use the mouse to select the desired highlight type. The type pointed by the mouse is surrounded by a frame.
  • Click on the pattern surrounded by a frame to select. Your choice will be reflected in the screen.
When Easy Web Browsing is launched for the first time, "Invert setting" is selected as the initial setting.

Click the "Initial value" button to revert all settings in this advanced setting panel to their initial values.
Click the "Close" button to save all new settings as is.


Magnification window settings

Magnification window settings panel Use the "Window height" slider to determine how large the magnification window can be.
  • Select either "None", "1", "3" or "5" for the window height.
  • Selection left move button and Selection right move button can also be used to select between "None", "1", "3" and "5".
  • When Selection left button un-displaying or Selection right button un-displaying is displayed, that button cannot be clicked.
  • When "None" is selected, the magnification window itself will not be displayed. Instead, the Windows taskbar will appear.
3 is the initial setting.

Use the "Font size" slider to select the size of text to be displayed, from one of six possible sizes.
  • Select the desired size, which may be either "1", "2", "3", "4", "5" or "6".
  • Use Selection left move button and Selection right move button to select either "1", "2", "3", "4", "5" or "6".
  • When Selection left button un-displaying or Selection right button un-displaying is displayed, that button cannot be clicked.
3 is the initial setting.

Turn on the "Magnification text, Show magnification window" checkbox to display the text currently being read in the magnification window.
When Easy Web Browsing is started for the first time, the check is turned on.

Click the "Initial value" button to revert all settings in this advanced setting panel to their initial values.
Click the "Close" button to save all new settings as is.


Setting panel of Easy Web Browsing

Contents

This setting page provides a single list of all the items that can be set, for the convenience of experienced Easy Web Browsing users. Beginning users are recommended to click on the triangle in the operation panel and select the available advanced options shown.
contents panel

This advanced setting list page is divided into four categories: "Screen," "Speech," "Text," and "Other." Please note that this categorization method differs slightly from the one used for the advanced setting panels selectable from the operation panel.

  • Screen
    • Color
    • Zoom
    • Magnification
    • Layout
  • Speech
    • Speech sound
    • Speech method
    • Speech position
  • Text
    • Space
    • Ruby (Japanese only)
  • Other
    • Sound effect
    • Mouse
    • Welcome page
    • Print
    • Browser operation
    • other

"Screen", "Speech", "Text", "Other"

Although the ruler settings can also be made from selecting "Other" - "Mouse," the Advanced setting panel provides even more detailed settings.

Items that can only be set from the Advanced setting list page

  • It is also possible to show magnified text in a popup window. To do this, select "Screen" - "Magnification" - "Show reading text on popup window".
  • It is possible to freely move the position of the control panel, instead of keeping it in a fixed place. To do this, select "Screen" - "Layout" - "Panel layout".
  • It is possible to display the vertical magnification. To do this, select "Screen" - "Layout" - "Panel layout" - "Full screen with vertical magnification window".
  • It is possible to set the number of lines expanded in the pull-down menu. To do this, select the number from "Screen" - "Layout" - "Pull-down menu expand lines".
  • It is possible to display the progressing status of voice synthesis software when it is automatically enabled. To do this, select "Speech" - "Speech sound" - "Show voice status of speech".
  • It is possible to change the position to start reading. To do this, select "Speech" - "Speech method" - "Speech start position".
  • The Welcome page is usually displayed only once, after installation. To display this page one more time, select "Other" - "Welcome page".
  • If you want to print out pages maintaining the options you set such as the text color pattern, select "Other" - "Print" - "Print as the current color setting".
  • It is possible to create a shortcut icon on the desktop. To do this, select "Other" - "Other" - "Create shortcut at the desktop".
  • It is possible to reset all setting changes to the values initially set up for Easy Web Browsing. To do this, select "Other" - "Other" - "Reset all settings to the initial values".
Setting panel (screen) Setting panel (speech)
Setting panel (speech) Setting panel (text)
Setting panel (other) Setting panel (other) continuation